How to include Variant in the Transport Request No?

In this tutorial I will show to you how to add variant into your transport no. Variant is not attached to the transport automatically. So when you create a variant in your development system and you want to transport this variant into your testing or production system, you need to add this manually.

On how to do this, you need to follow these steps.

STEPS:
1. Run SE38 and enter your program name. Select Variant from the subobjects list. Please note, its not source code but the radio button variant. Then click button Display.


2. In this next screen, enter the name of your variant. If you dont have any variant name yet, please create. I will not discuss here on how to create variant.


3. Once you entered the variant name, go to main menu, then click Utilities->Transport Request.


4. In this screen, enter the name of the Variant just like below. Then hit the execute button.


5. In this screen, just click the continue button.


6. Once done, the transport request window appears. Be sure to save your variant to the exact transport no where your program is attached.


That's all for now. And wishing that I have share a little tips for you. Again, thanks a lot for reading. Enjoy...

How to debug popup screen in SAP?

Debugging an ABAP program is simple. Just insert a breakpoint on the ABAP editor or  type /h on the command line during runtime and bingo, the debugger is on. These methods are only applicable for normal screens. But how about if you want to debug a pop-up screen? Are these method still possible?

In this tutorial, I will share to you two methods on how to debug popup screens.

Method 1. Create a system-independent debugger shortcut. There are two ways to create shortcut.

First way: On the Main menu of your window, go to Edit-Create shortcut on the desktop link just like below.


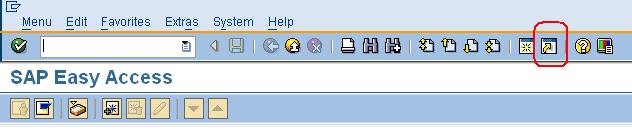
Second way:  From the toolbar of any windows, click the button “Generate a Shortcut”.


So in this method you are creating a shortcut to be placed in your desktop. Either in this ways mentioned above, this screen below will appear. Fill up accordingly as displayed on the screenshot. Be sure to fill up the following details:

Type: System Command
Command: /H
Title:debugger

Then click Ok button after you completed filling up. Be sure to input also the directory where the file will be saved.


A file like this below will be generated on the location you specified.   Now drag and drop the file into the popup window and your ABAP debugger will be switched on!  


Method 2.Generate a new text file. Edit it with any word editor. Insert the following contents below. Be sure to type it as it is (four lines). Otherwise it will not work.

[Function]
Command=/H
Title=Debugger
Type=SystemCommand

Save the file and rename it as 'Debugger.sap'. This way the shortcut is defined. You can now drag and drop it to the popup window in order to activate the debugger.


Please see SAP Note: 118184 for reference. Keep on reading... Enjoy. :)

How to group radio button in Dialog Screen?

When we are working with radiobuttons using selection parameters, we usually use the keyword GROUP so they will be grouped accordingly like this code below.

PARAMETERS: rb1 RADIOBUTTON GROUP rb.
PARAMETERS: rb2 RADIOBUTTON GROUP rb.

But how about when we work radiobuttons in dialog screens? How do we group them? Is it the same? Definitely No.

In this tutorial, I will discuss how to implement grouping of radiobuttons when working with Dialog Screens.

STEPS:
1. Go to your screen where the radiobuttons are situated. As you can see below, I have two radiobuttons below.


If I run immediately this program without grouping the radiobuttons, it will look like this one. Both radiobuttons are selected.


2. In order to fulfill our requirement, go back to our screen where these radiobuttons are located. You need to select both radiobuttons. In order to do, pressed CTRL key while clicking each buttons. In that way, you will notice that there will be a solid line that enclosed both radiobuttons (see below).


3. After selecting both radiobuttons,on the main menu go to Edit->Grouping->Radio Button Group ->Define.


After defining the grouping, the solid line that enclosed both radiobuttons will turn into broken lines like this one below.


4. And there you are. You are done. Activate and run your program. You will see now that only one radiobutton is selected.


Thanks again for reading this simple tutorial. Hope it helps. :)

SAP DIALOG PROGRAMMING: How to trigger the small "X" button in the upper right of a popup screen?

While developing a program, I need to show a pop screen. Normally, I do this way.

CALL SCREEN 200 STARTING AT 2 2.

However, I have a problem on how to trigger this small "x" button at the upper right of the screen like this one below.


Since I was puzzled how it was done, I did some research and testing, I found the solution which I will detailed below. This are simple steps to implement such functionality in sap dialog programming.

STEPS:
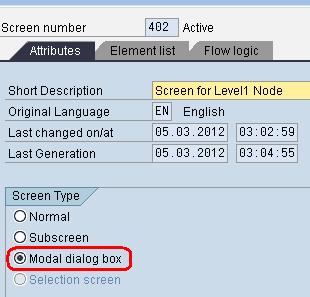
1. Set your pop up screen as a modal dialog box. Never select it as a normal. For you to set it, go to SE80 then select screen from the nodes at the left part. Once done, click on the attribute tab and there you will see the screen type of the screen.


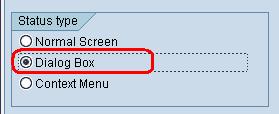
2. Create a PF-STATUS which is Dialog Box type.


3. Then inside this status, there are two default command. One for the ok/continue and one for the exit/cancel command. So I used here the cancel command for the "x" button.


4. In the PAI of your pop up screen, catch the sy-ucomm. In this example I used CANCEL.After that, activate and run your program. Be sure to put a debug point in the PAI so that when you hit the small "x" button, it will stop into your PAI.

I hope I share again a simple tip to everyone on how to trigger the small exit button in a pop up screen using sap dialog programming. For any comments and suggestions, you may leave it below and I am happy to hear from you.

Enjoy... :)

How to implement a drop down list in ALV grid?

Drop down list is feasible to integrate into an ALV grid. It is different with a Search Help approach since we need to hit the F4 key first. But their functionality is just the same which displays a list of data where the user can select and no need for him to type.

In this tutorial, I will discuss to you how to implement a drop down list into your ALV grid. I am using the class approach and not the FM way in displaying the ALV grid.

STEPS:
1. In setting the fieldcatalog, set the column where the drop down list will appear. Set the parameter drdn_hndl which is included in the structure LVC_S_FCAT. So if your ALV grid will display four(4) columns and you want to display the drop down list on the second column, the value of the parameter would be drdn_hndl = 2.

2. Create a sub routine where it will fill the dropdown table. Call this subroutine before the method set_table_for_first_display.

3.Inside this subroutine, do the following steps. First, call the internal table which consists the records for display. Second, loop the internal table and pass the value of the text to another internal table, let say i_dropdown. Be sure to pass also the handle which is equivalent to the value you set in fieldcatalog. Lastly, pass the internal table to the method set_drop_down_table. (see sample codes below)

4. Once done, activate and run your program. Your output must look something like this. If you haven't produce the same, please leave a message and I will try to answer your questions.

Thanks a lot again for reading my tutorial. See you on my next post. ::) Keep on reading.

How to implement a "Context Menu" in ALV Tree?

Context menu is triggered when the user pressed the right mouse key or SHIFT F10 (see screenshot below). It allows user to select list of functions dynamically defined. It may contain any functions, and is not restricted to function keys. Context menu can be assigned to the following screen elements namely: Input/output fields, Text fields, Table controls, Group boxes, subscreens pushbuttons, checkboxes, or radio buttons. 

In this tutorial, I will show to you how to add a context menu in ALV Tree.By the way, I am using here OOP approach. So if you dont have any background in OOP, I hope you have time to read some OOP materials so that you have an in-depth background for this implementation. Otherwise, you will not appreciate such tutorial.

STEPS:
1. Define a local class with a method handle_node_cm_req and handle_node_cm_sel.

2. In the method, handle_node_cm_req, define here the function list you want to appear as context menu. Use the method add_function to add the different context menus.

Also you can use the method add_separator to show a horizontal grayed bar between menus. Position this in between context menus.

3. In the method, handle_node_cm_sel, this will handle the PAI of the object. So once the user click on the menu, this method will be triggered and catches the sy-ucomm. For demonstration purposes, I haven't added any logic. Its up to you what to logic to add depending on your requirement.

4. Once the methods of the class is set-up, go to the PBO of your main screen where the ALV tree will be displayed. In OOP, ALV tree or ALV grid is displayed using the method set_table_for_first_display. So after this method is called, you need to register the events for the ALV. For context menu, you need to pass the attribute EVENTID_NODE_CONTEXT_MENU_REQ from the class cl_gui_column_tree. 

Then pass the internal table to the method set_registered_events.

5. Finally, register the context menu event on the backend for event handling using SET HANDLER commands. 

6. Once done, activate your program and try to run. Your ALV tree must look something like this.

I hope you enjoy reading my tutorial again and wishing to hear from you. By the way, there are other approach on how to implement a context menu using the PF-STATUS. On my succeeding post, I will discuss this subject matter for everyone.

Enjoy :)

SAP REPORT LIST: How to add a "Link Click" on ALV Report in SAP ABAP?

A Link Click is similar with a hotspot that when you hover your mouse, the cursor changes into a hand like this on the left. Then upon clicking on it, it will execute an action such as calling a new screen.

In this tutorial, I will discuss to you how to implement this functionality in ALV Report Tree using SAP ABAP OOP. I assumed however, that you have background knowledge now on how to manipulate ALV trees using Object Oriented concept. Otherwise, please stop and have some refresher first in OOP so that you have further understanding on how to control the ALV tree.


As can be seen into this screenshot above, the column Airline has a link click functionality. As I said, upon hovering your mouse, the cursor changes into a hand style. Actually, we can manipulate each node, if it has a link click functionality or none. So in this case, both LH and SQ have link click functionality under the Airline column.


STEPS:
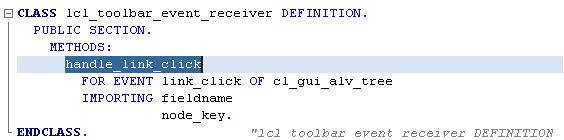
1. Create a local class and define a method named "handle_link_click".

2. On the implementation of the method "handle_link_click" write any ABAP codes you want. In my example, I try to call a new screen, 201 which is in pop up mode using the keyword AT x-position y-position.

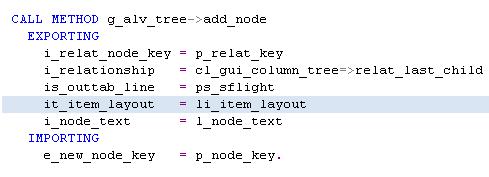
3. In the PBO of your main screen, let say screen 100, do the following additional steps. Normally, when creating the hierarchy tree, this is done after calling the method "set_table_for_first_display". This is the time you are adding the node to your ALV tree. During the node creation using the method "add_node", add the exporting parameter "it_item_layout".

4. In this next step you need to fill up the internal table "li_item_layout". First declare it accordingly. Then pass the name of the column where the link click will appear. In my example, I passed the field CARRID which represents the airline column. Finally, pass the value of the attribute "item_class_link" (which is 5 initially) from the class cl_gui_column_tree .

As I said above, we can manipulate each node of the ALV tree. If you want to show a link click of that particular node, pass the attribute item_class_link but if you want just to display the text without any link click of that node, pass the attribute item_class_text.

In my sample below, I just pass the attribute item_class_link to every node. Thus all nodes will have a link click effect. Please refer below for sample codes.

5. After doing so, register the event. This is needed so that the ALV tree will recognize the link click event, once triggered.

6. Once the event is registered, set handler to it. Please take note that the name of my local class in this tutorial is lcl_toolbar_event_receiver. So this might change depending on you.

7. Lastly, Save and Activate . Run your program and you will see the link click functionality in your ALV tree.
OUTPUT:


I Hope you enjoy this tutorial in implementing the link click functionality of ALV report in SAP ABAP using OOP method. For any clarifications and suggestions, please leave your comments below. I love to hear you guys.

How to download the data structure of tables in SE11?

Good morning people around the world. Its me again doing some blogs. Sharing to you some tips and tricks in the SAP world. Well, before I s...