Showing posts with label ABAP Tools. Show all posts

How to download the data structure of tables in SE11?

Good morning people around the world. Its me again doing some blogs. Sharing to you some tips and tricks in the SAP world. Well, before I start my topic today, just want you to know that our country was hit by one of the strongest typhoons on earth this year named "Yolanda". Thank God and it did not hit directly Manila, the capital of the country where millions of people are living. Just recently, Bohol in the Visayan island was hit another 7.2 magnitude earthquake which causes more than 200 people died. Anyway, let us pray together to all our brethren who were in the midst of this natural calamity.

So to begin my discussion today, I will share to you a great tutorial which I know it will be beneficial to all. Many SAP systems have customized developments. In relation to it, there are custom tables also that were created by the ABAP developers. Now, the question of many developers is, how can they back up their tables into their laptops or computers? Just like in my previous blog which I tackled on how to download your ABAP code into PDF file, now what we want to download into our own computer is the structure of our custom table that we created?

Why do we need to download the structure of our custom tables? Basically, we need to have a copy of it as for our future reference. Actually, in other databases like MySQL, there is that functionality of IMPORT/EXPORT which you can download the whole database into your computer. But in SAP, this feature is not supported. What SAP offers is the transport system from one system to another but not into your own computer.

So in this tutorial, I will discuss to you a simple way to back-up your custom tables into your local drive. Just follow the steps below:
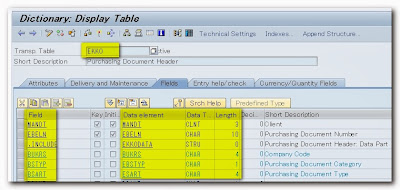

Steps:

1. First, open your custom table using SE11. What I used as an example here is EKKO which is a standard table.


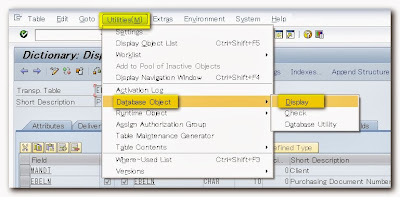
2. In the file menu, click Utilities->Database Object->Display.

3. A new screen like this one below appears showing the structure of the table. Please take note that the data elements were replaced with elementary data types.
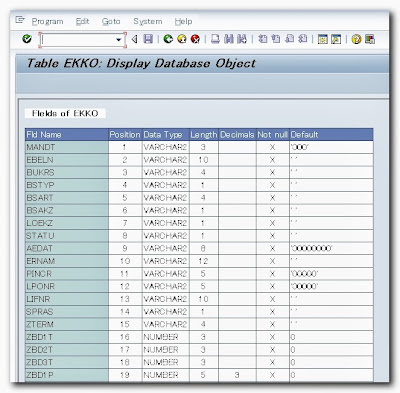

4. Normally, when we download, we go to System ->List->Save. But as you can see, all options are disabled.


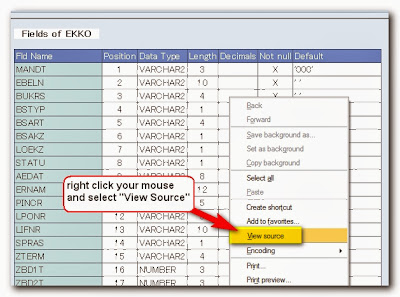
5. In order to download it, put your mouse cursor anywhere in the table then right-click it. From the context menu, select View Source.

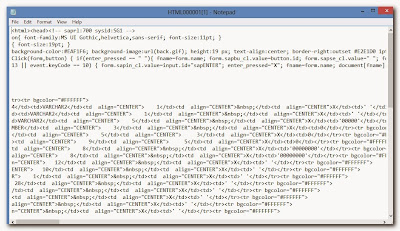
5. A notepad then appears displaying the source code of the table. This is an HTML format.

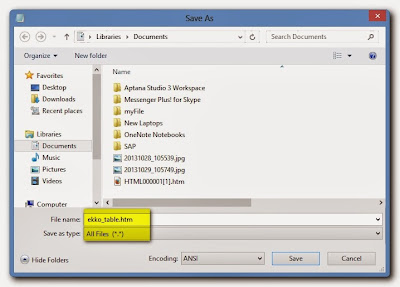
6. Click the Save in the file menu. This dialog appears. Then save your file anywhere now into your local drive. Remember, since this is an HTML file, save this way, your filename must end with .html, so example, table_ekko.html. And the last reminder is, change the "Save as type" into "All files" (Please refer to screenshot below).

7. Congratulations. you have now a copy into your local drive the custom table you created. Go to the directory where you save your file. Open it and it will look the same as the one in SAP.
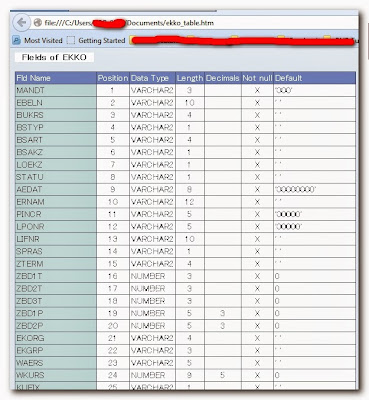

Sample Result:

How to download your ABAP Codes into PDF file?

It's my first day of work again after suffering a long week of vacation due to influenza. Ouch. Well, no one wants to get sick. Im just so lucky enough it was not a dengue or whatsoever complicated illness but its a plain flu which needs a bed rest. In effect, my ABAP developments were curtailed and postponed for its delivery.  Thanks a lot to my Project Manager for her kind considerations.

So today, I finished doing my task assigned to me the previous week. Actually, it just a finishing touch producing the desired result. After a couple of hours doing it, its done and ready for testing. After I test and it passes with all the requirements and conditions set in the functional design, I decided to download the ABAP codes I did for future reference since it uses a dynamic internal table that has a static fields.

Normally, when I backup my ABAP codes, I just COPY-PASTE it in a notepad or in a word document. This technique is ok. But now I want to have a PDF file so I can save it into my mobile phone in order to view it anywhere at any given time.

Well, this is now the solution I discovered which I want to share to everyone.

Steps:
1. At the lower right part of the ABAP editor, you will see this button in yellow. That button is below the vertical scroll bars. Click this button to view the different options.


2. From the options, click keyboard. Then select File.ExportPDF from the command list. Please refer from the screenshot below.


3. On the input box, New Shortcuts, type CTRL + ATL + L. Then click the button Assign. By the way, the combination of the keys can be different from yours as long as it is available. It so happened that this key combinations are available so I used in this tutorial. After clicking the Assign button, you will see the keys reflected in the Shortcuts for selected commands textbox. Then click the Save button afterwards.


4. Once you save the settings you did above, you will be back into your ABAP editor. Now, in your editor, pressed the key combination you set. In my case, I will press 
 CTRL + ATL + L. Immediately, the Save dialog box will be prompted like this one. Type the filename of your file and locate the directory where you want to save. Finally, click the Save button to create the PDF file.


So that's how simple to create a PDF file for your ABAP codes. I hope you like this tutorial.


Sample PDF Output:

How to create a number range in SAP using SNRO?

During ABAP development, sometimes we need to generate a unique ID which is needed as primary key for a custom table we created. Unlike in other databases such as mySQL that a field can be set as auto-increment once defined as primary key. In SAP environment, this feature is missing in table creation so we need to setup a number range that generates distinct number which increments and used as primary key. 

A Number Range is a sequence of numbers with a start and an end. It shows the current number that is being used in your program. Letters cannot be added as a prefix or suffix in generating number ranges like, A-001, A-002, etc.

So in this tutorial, I divided into four parts which I will discuss one by one. It includes the following topics:
  1. Setting the number range definition
  2. Setting the number range object
  3. Transporting the number range to other system
  4. Implementing the number range in a program
Steps:

Setting the Number Range Definition
First, type the tcode SNRO into the command prompt.

Then, enter a name in the input field for your number range object. Note that it must begin with Y or Z just like in other objects that indicates it is a customer development. After which, click the Create button .


In this next screen, set the following parameters:
a. Short Text – short description for the number range (20 characters).
b. Long Text – long description for the number range (60 characters).
c. Number length domain – Name of the domain, which determines the length of the number range number
d. Warning % - Percentage of no remaining in a number range, upon reaching which in number assignment is given. Example, you have defined an interval of 1 to 1000. If you want to issue a warning at the number 900, enter 10% here.


Click on the Save button  in the toolbar menu to save the number range definition. A popup screen will be displayed which you need to add a package. But for this tutorial, just click the Local Object below.


Setting the Number Ranges Interval
After creating the number range definition, the next step is to set the intervals for this object. Go back to the main window, click the button Number Ranges button on the toolbar.


Then in this screen, click the button Change Intervals. 

Then click the Add Interval button on this screen.


Enter an integer for the column “No”, “From Number” and “To Number”. This is the number range interval set for this object. Then press enter and click the check button .


Click on "Save" button. And the number range interval you have just declared will be listed in the Number Range object 's number intervals list. You can declare multiple intervals but be sure there will be no overlapping between intervals.


Transporting the number range to other system
The following warning screen is displayed once you save the number ranges. It states that the interval is not automatically added on the transport request no. So we need to add the intervals manually on the transport request number in order to be transported to other system.

Go back again into the main screen. On the file menu, click menu Interval->transport as seen below.


This transport message appears afterwards. Just click the Yes button below to include the intervals in a transport request no.


After which, it will create a transport request number which adds the number range interval. Thereby, it can be transported now to other system.


Implementing the number range in a program
After defining the number range object, it’s time to discuss how to use number range object in ABAP code. The following function modules are used in implementing the number range object:
  1. NUMBER_RANGE_ENQUEUE -function sets a lock on the number range object. 
  2. NUMBER_GET_NEXT - function call the next number in the number range interval is read and passed into an ABAP variable.
  3. NUMBER_RANGE_DEQUEUE - function and removing the lock on the relate SAP number range object.
Complete Sample Code:

 1
 2
 3
 4
 5
 6
 7
 8
 9
10
11
12
13
14
15
16
17
18
19
20
21
22
23
24
25
26
27
28
29
30
31
32
33
34
35
36
37
38
39
40
41
42
43
44
45
46
47
48
49
50
51
52
53
54
55
56
57
58
59
60
DATA: gv_id TYPE i.
CONSTANTS:
   c_obj TYPE inri-object     VALUE 'ZNEWTEST',
   c_no  TYPE inri-nrrangenr  VALUE '01'.

START-OF-SELECTION.
  PERFORM f_getnextnum USING gv_id c_obj c_no.
  WRITE gv_id.

*&---------------------------------------------------------------------
*& Form f_getnextnum
*&---------------------------------------------------------------------
* text
*----------------------------------------------------------------------
FORM f_getnextnum USING
      p_nextnum TYPE i
      p_rangeobj TYPE inri-object
      p_rangeno TYPE inri-nrrangenr.

  CALL FUNCTION 'NUMBER_RANGE_ENQUEUE'
    EXPORTING
      object           = p_rangeobj
    EXCEPTIONS
      foreign_lock     = 1
      object_not_found = 2
      system_failure   = 3
      OTHERS           = 4.
  IF sy-subrc NE 0.
    MESSAGE ID sy-msgid TYPE sy-msgty NUMBER sy-msgno
    WITH sy-msgv1 sy-msgv2 sy-msgv3 sy-msgv4.
  ENDIF.

  CALL FUNCTION 'NUMBER_GET_NEXT'
    EXPORTING
      nr_range_nr             = p_rangeno
      object                  = p_rangeobj
    IMPORTING
      number                  = p_nextnum
    EXCEPTIONS
      interval_not_found      = 1
      number_range_not_intern = 2
      object_not_found        = 3
      quantity_is_0           = 4
      quantity_is_not_1       = 5
      interval_overflow       = 6
      buffer_overflow         = 7
      OTHERS                  = 8.
  IF sy-subrc <> 0.
    MESSAGE ID sy-msgid TYPE sy-msgty NUMBER sy-msgno
    WITH sy-msgv1 sy-msgv2 sy-msgv3 sy-msgv4.
  ENDIF.

  CALL FUNCTION 'NUMBER_RANGE_DEQUEUE'
    EXPORTING
      object = p_rangeobj.
  IF sy-subrc <> 0.
    MESSAGE ID sy-msgid TYPE sy-msgty NUMBER sy-msgno
    WITH sy-msgv1 sy-msgv2 sy-msgv3 sy-msgv4.
  ENDIF.
ENDFORM.  

ABAP Syntax Highlighter that works

Good morning to all... After several months of being quite in this blog due to my developments with my PHP programming, I am back again to share with you what I learned and found out across the web. First is this, syntax highlighters for ABAP programming language. Well as you know, this blog is dedicated for ABAP programmers. So basically, ABAP source code is important to share. And one way to present it to the public is to use a syntax highlighter just like SE38 or simply the standard ABAP editor of SAP.

Long time ago, I am curious how does other blogs present ABAP codes in a manner that it is like that on the ABAP editor. So today, I gave myself a try to do it here in my blog. After a couple of hours searching the web,  and testing several sites which focuses on syntax highlighting, I found out and tested here in Blogger the one that works here and I would like to share with you how to implement it into your blogs as well. Please take note that this tutorial is only for Blogger platform as this is the platform where I am writing my blogs.

By the way, I would like to share with you also the following sites which I tested and no success after implementation. First is this github from Christian Jianeli. Actually, thanks to this man for sharing this brush for ABAP. Two thumbs up to you man. The way I look with the source code, it is patterned with Alex Gorbatchev. After embedding this into my blogger template and adding the html PRE tag which brush = abap, my ABAP codes still looks the same. Nothing changes. Definitely I think that I need to download this github and upload it into my own hosting. In that manner, it will work. But since I am using the Blogger Platform, I dont need to download it but what I need is to link the syntax highlighter and use it into my blogs.


The second try that I used and tested is the one created by Alex Gorbatchev. Thanks to this man also for his wisdom in sharing his knowledge in creating this tool. You can download the whole package here. Actually, Alex made a awesome tool which I know many developers are using it now in their websites to highlights their own source code. The reason why this tool of Alex didn't work in my blog is, ABAP is not supported in his lists of brushes. If I am not wrong there are about more than 10 brushes which he is supporting but not among them is ABAP. I added actually all the brushes in my templates and made a try using XML brush and it works. However, since this blog is intended for ABAP developers, what I need is to have a brush that caters ABAP programming language where the ABAP syntax will be highlighted according to the ABAP editor looks. How I wish, Alex will read this blog and someday he will add ABAP as one of the brushes in his collections.


The last try that I use was Hilite.me. And here I got the result that I want to share with you. Well, steps to undertake is just simple. And here it is, just five steps:


 1. Copy your ABAP source code and paste it in hilite.me


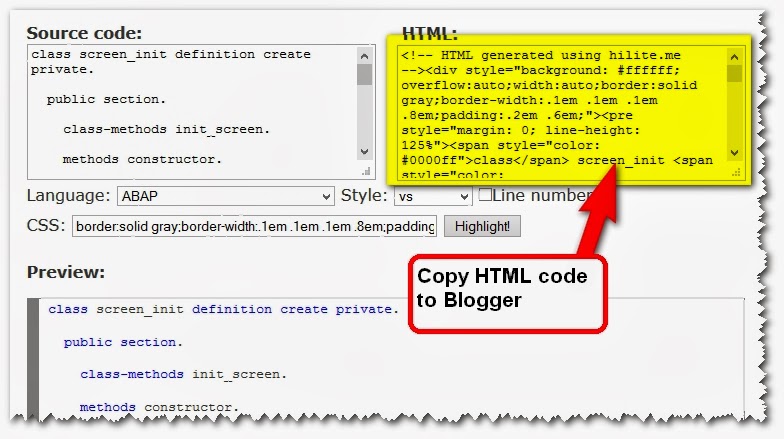
2. From the language option, select ABAP. You can also try to choose which style you want. Also, you can click the checkbox Line number if you want to add line numbering into your code. Afterwhich, hit the highlith! button. And there you are, an HTML code is generated which you will copy it to paste into your blogger account.


3. Now into your blogger account, go to your post. Create one post to try. Click the HTML button. It is besides the button Compose.


4. After clicking that HTML button, paste you HTML codes you copied from Hilite.me (step 2).


5. There you go. Its done. Save your post and publish it. The result of this ABAP Syntax highlighter would be something like this. I hope you enjoy this blog. Please share to your friends via the social bookmarks at the left side of this blog.


class screen_init definition create private.
 
  public section.
 
    class-methods init_screen.
 
    methods constructor.
 
  private section.
 
    data: splitter_h type ref to cl_gui_splitter_container,
 
          splitter_v type ref to cl_gui_splitter_container,
 
          picture type ref to cl_gui_picture,
 
          tree type ref to cl_gui_simple_tree.
 
    methods: fill_tree,
 
             fill_picture.
 
endclass.

How to access a TCODE without authorization?

Its weekend again and time to share all knowledge I learned over the week. I know this topic that I will discuss today would be beneficial to my fellow ABAP developers specially when they dont have the SAP_ALL authorizations. For the sake of everyone, SAP_ALL authorizations is an authorization provided to a user in which he can access all standard tcodes of SAP system. So whether this is a functional or technical tcode, it is possible to access. 

However, in an environment of a multinational company, this authorization is NOT permitted. As a developer, you are only given the access of all tcodes related to development like, SE38 (ABAP Editor), SE24 (Class Editor), SE37 (Function Module Editor) and other tcode related to development.

Now the issue is, how about if I want to access a particular tcode which is not related to ABAP Development? Let say, SU01, User Maintenance? But when I access it, I got this message "You are not authorized to access"? So in case you encounter it, what will you do?
Do you have any idea to by-pass the authorization set to your user account? Or will you ask your Basis people to grant you an access to this transaction code? How about if they denied your request? 

Dont worry now as the pain is over. Well, in this tutorial, I will discuss with you on how to access any SAP Tcodes even you don't have any authorizations.Yes, you are right. We will by-pass the that authorization limiting you to access a particular tcode. The only requirement here is you must have an access to SE38 and you have the role S_DEVELOP. Since you will be creating a new program which we will call, ZTCODE. :)

First thing, create an ABAP program. Then copy this program below. It is just a 12 liner program. A simple one.
 1
 2
 3
 4
 5
 6
 7
 8
 9
10
11
12
DATA: l_tcode TYPE sytcode.
PARAMETERS: p_tcode TYPE sy-tcode.
START-OF-SELECTION.

  SELECT SINGLE tcode FROM tstc
    INTO l_tcode
    WHERE tcode = p_tcode.
  IF sy-subrc = 0.
    CALL TRANSACTION p_tcode.
  ELSE.
    MESSAGE 'TCODE not found.' TYPE 'I'.
  ENDIF. 
Once you are done, save and activate your program. The secret here is be sure to create a customized transaction code for this program. Let say, ZTCODE. Otherwise, you can't access that particular tcode you want to view. Clear? 


Result:
Initially, I can't access SU01.


But after I created this program, I activated and ran it.


And voila, I can now access SU01 without the BASIS people. :)

How to create a dynamic internal table?

Dynamic internal table is an extension to the internal table concept. It is used when the number of fields is NOT known at the design time or until the compile time. So in this tutorial, I will discuss the basic methods in implementing a dynamic internal table.

First add the static structure. When I say static structure, this is the structure that is declared explicitly in your ABAP program. In my sample codes below, I have two fields for my static structure. (see TYPES: t_output in the sample code below).

Next, count how many no. of columns to be added dynamically. You can compute this from the selection screen from where it will be referenced. So in my sample code below, I have one parameter. Based from this parameter, user will enter how many columns they want to add. So be sure, you must define this point since this is critical where the number of columns will be determined. Remember that the number of column is the number of loop.

Then, combine the dynamic columns together with the static fields. However, before you can combine you must do the loop adding the dynamic column with their fieldname and datatype. (see subroutine f_add_dyn_field in the sample code below)

Finally, create the dynamic table by instantiating it with reference to cl_abap_structdescr . The dynamic table then will be passed to the FM REUSE_ALV_GRID_DISPLAY for display. Remember also in creating the fieldcatalog, you must do a loop to add the dynamic column. Otherwise, it will not be displayed. For reference, see the routine f_build_fieldcatalog.

Complete Sample Code:

  1
  2
  3
  4
  5
  6
  7
  8
  9
 10
 11
 12
 13
 14
 15
 16
 17
 18
 19
 20
 21
 22
 23
 24
 25
 26
 27
 28
 29
 30
 31
 32
 33
 34
 35
 36
 37
 38
 39
 40
 41
 42
 43
 44
 45
 46
 47
 48
 49
 50
 51
 52
 53
 54
 55
 56
 57
 58
 59
 60
 61
 62
 63
 64
 65
 66
 67
 68
 69
 70
 71
 72
 73
 74
 75
 76
 77
 78
 79
 80
 81
 82
 83
 84
 85
 86
 87
 88
 89
 90
 91
 92
 93
 94
 95
 96
 97
 98
 99
100
101
102
103
104
105
106
107
108
109
110
111
112
113
114
115
116
117
118
119
120
121
122
123
124
125
126
127
128
129
130
131
132
133
REPORT  y_dynamic_table.

TYPE-POOLS : abap,slis.

TYPES: BEGIN OF t_output,
  bukrs TYPE bukrs,
  dmbtr TYPE dmbtr,
END OF t_output.

DATA:
   wa_data_ref         TYPE REF TO data,
   wa_struct_type      TYPE REF TO cl_abap_structdescr,
   wa_elem_type        TYPE REF TO cl_abap_elemdescr,
   wa_comp_fld         TYPE cl_abap_structdescr=>component,
   i_comp_tab          TYPE cl_abap_structdescr=>component_table,
   i_comp_tot_tab      TYPE cl_abap_structdescr=>component_table,
   g_total_field       TYPE i,
   g_tabix(2)          TYPE c.

DATA:
   i_fieldcatalog      TYPE slis_t_fieldcat_alv WITH HEADER LINE,
   g_layout            TYPE slis_layout_alv.

FIELD-SYMBOLS:
   <fs_it_output>      TYPE STANDARD TABLE,
   <fs_wa_output>      TYPE ANY.

SELECTION-SCREEN BEGIN OF BLOCK b1 WITH FRAME.
PARAMETERS: p_nocol(2) TYPE c DEFAULT 5.
SELECTION-SCREEN END OF BLOCK b1.

START-OF-SELECTION.
  PERFORM f_add_static_structure.
  PERFORM f_add_dyn_field.
  PERFORM f_create_dyn_itab.
  PERFORM f_display_alv_report.

*&--------------------------------------------------------------*
*&      Form  F_CREATE_DYN_ITAB
*&--------------------------------------------------------------*
FORM f_add_static_structure.
  wa_struct_type ?= cl_abap_typedescr=>describe_by_name( 'T_OUTPUT' ).
  i_comp_tab = wa_struct_type->get_components( ).
  APPEND LINES OF i_comp_tab TO i_comp_tot_tab.
ENDFORM.                    " F_CREATE_DYN_ITAB

*&--------------------------------------------------------------*
*&      Form  F_ADD_DYN_FIELD
*&--------------------------------------------------------------*
FORM f_add_dyn_field .
  g_tabix = 0.
  DO p_nocol TIMES.
    g_tabix = g_tabix + 1.
    wa_elem_type ?= cl_abap_elemdescr=>describe_by_name( 'DMBTR').
    CONCATENATE 'COL_' g_tabix  INTO wa_comp_fld-name.
    wa_comp_fld-type = cl_abap_elemdescr=>get_p(
    p_length = wa_elem_type->length
    p_decimals = wa_elem_type->decimals ).
    APPEND wa_comp_fld TO i_comp_tot_tab.
  ENDDO.
ENDFORM.                    " F_ADD_DYN_FIELD

*&--------------------------------------------------------------*
*&      Form  F_CREATE_TAB
*&--------------------------------------------------------------*
FORM f_create_dyn_itab.
  wa_struct_type = cl_abap_structdescr=>create( i_comp_tot_tab ).
  CREATE DATA wa_data_ref TYPE HANDLE wa_struct_type.
  ASSIGN wa_data_ref->* TO  <fs_wa_output>.
  CREATE DATA wa_data_ref LIKE STANDARD TABLE OF <fs_wa_output>.
  ASSIGN wa_data_ref->* TO <fs_it_output>.
ENDFORM.                    " F_CREATE_TAB

*&--------------------------------------------------------------*
*&      Form  f_display_alv_report
*&--------------------------------------------------------------*
FORM f_display_alv_report .
  PERFORM f_create_layout USING g_layout.
  PERFORM f_build_fieldcatalog.
  CALL FUNCTION 'REUSE_ALV_GRID_DISPLAY'
    EXPORTING
      i_callback_program       = sy-repid
      i_callback_pf_status_set = 'PF_STATUS'
      is_layout                = g_layout
      it_fieldcat              = i_fieldcatalog[]
    TABLES
      t_outtab                 = <fs_it_output>
    EXCEPTIONS
      program_error            = 1
      OTHERS                   = 2.
ENDFORM.                    " F_DISPLAY_ALV_REPORT

*&--------------------------------------------------------------*
*&      Form  f_create_layout
*&--------------------------------------------------------------*
FORM f_create_layout USING p_gd_layout TYPE slis_layout_alv.
  p_gd_layout-zebra = 'X'.
  p_gd_layout-colwidth_optimize = space.
ENDFORM. " f_create_layout

*&--------------------------------------------------------------*
*&      Form  pf_status
*&--------------------------------------------------------------*
FORM pf_status USING ut_extab TYPE slis_t_extab.
  SET PF-STATUS  'STANDARD_FULLSCREEN'  OF PROGRAM 'SAPLKKBL'.
ENDFORM.                    "pfstatus

*&--------------------------------------------------------------*
*&      Form  f_build_fieldcatalog
*&--------------------------------------------------------------*
FORM f_build_fieldcatalog.
  REFRESH i_fieldcatalog.
  i_fieldcatalog-fieldname  = 'BUKRS'.
  i_fieldcatalog-seltext_l  = 'Company Code'.
  i_fieldcatalog-outputlen  = 20.
  APPEND i_fieldcatalog TO i_fieldcatalog.
  CLEAR i_fieldcatalog.
  i_fieldcatalog-fieldname  = 'DMBTR'.
  i_fieldcatalog-seltext_l  = 'Amount'.
  i_fieldcatalog-outputlen  = 10.
  APPEND i_fieldcatalog TO i_fieldcatalog.
  CLEAR i_fieldcatalog.
  g_tabix = 0.
  DO p_nocol TIMES.
    g_tabix = g_tabix + 1.
    wa_elem_type ?= cl_abap_elemdescr=>describe_by_name( 'DMBTR').
    CONCATENATE 'COL_' g_tabix  INTO wa_comp_fld-name.
    i_fieldcatalog-fieldname  = wa_comp_fld-name.
    i_fieldcatalog-seltext_m  = wa_comp_fld-name.
    i_fieldcatalog-outputlen  = 13.
    APPEND i_fieldcatalog TO i_fieldcatalog.
  ENDDO.
ENDFORM.                    "f_build_fieldcatalog


Output:


Five columns are added.


thanks a lot again for reading... keep on visiting this blog... enjoy... :)

How to download the data structure of tables in SE11?

Good morning people around the world. Its me again doing some blogs. Sharing to you some tips and tricks in the SAP world. Well, before I s...