How to display two ALV grid in one screen?

Hello everyone. Its another topic I want to discuss with you today. Pause for a moment and take a look with this simple ALV grid below. Do you see it? Its two ALV Grid in just one screen. Have you been asked to do to display such? If not yet, then its time for you to take this sample codes I provided below.


REPORT  YYZZYY_TWO_ALV.


DATA: ok_code LIKE sy-ucomm,
      gt_sflight TYPE TABLE OF sflight,
      grid1  TYPE REF TO cl_gui_alv_grid,
      grid2  TYPE REF TO cl_gui_alv_grid.

* splitter control
DATA splitter TYPE REF TO cl_gui_easy_splitter_container.
* container for the splitter control
DATA container TYPE REF TO cl_gui_custom_container.

* containers created by the splitter control
DATA container_1 TYPE REF TO cl_gui_container.
DATA container_2 TYPE REF TO cl_gui_container.
* load control framework definition
TYPE-POOLS cndp.
*---------------------------------------------------------------------*
*       MAIN                                                          *
*---------------------------------------------------------------------*

SELECT * FROM sflight INTO TABLE gt_sflight.

CALL SCREEN 100.


*&---------------------------------------------------------------------*
*&      Module  STATUS_0100  OUTPUT
*&---------------------------------------------------------------------*
*       text
*----------------------------------------------------------------------*
MODULE status_0100 OUTPUT.
 SET PF-STATUS 'MAIN100'.
  set TITLEBAR '100'.
  IF  container_1 IS INITIAL.

* create a container for the splitter control
    CREATE OBJECT container
                  EXPORTING container_name = 'CUSTOM'.
* create the splitter control
    CREATE OBJECT splitter
                  EXPORTING parent = container
                            orientation    = 1"0-horizontal; 1-vertical
* get the containers of the splitter control
    container_1 = splitter->top_left_container.
    container_2 = splitter->bottom_right_container.
* create the picture controls inside the containers of the splitter

    CREATE OBJECT GRID1
           EXPORTING I_PARENT =  container_1.
    CALL METHOD GRID1->SET_TABLE_FOR_FIRST_DISPLAY
         EXPORTING I_STRUCTURE_NAME = 'SFLIGHT'
         CHANGING  IT_OUTTAB        = GT_SFLIGHT.


    CREATE OBJECT GRID2
           EXPORTING I_PARENT =  container_2.
    CALL METHOD GRID2->SET_TABLE_FOR_FIRST_DISPLAY
         EXPORTING I_STRUCTURE_NAME = 'SFLIGHT'
         CHANGING  IT_OUTTAB        = GT_SFLIGHT.
endif.
ENDMODULE.                 " STATUS_0100  OUTPUT
*&---------------------------------------------------------------------*
*&      Module  USER_COMMAND_0100  INPUT
*&---------------------------------------------------------------------*
*       text
*----------------------------------------------------------------------*
MODULE user_command_0100 INPUT.
  CALL METHOD container->free.
  LEAVE PROGRAM.
ENDMODULE.                 " USER_COMMAND_0100  INPUT
 

How to add Select options in Dialog screens?

SELECT-OPTIONS is a complex selection which has a structure of  lower and higher limit. Users can input multiple values as range or individual value filling up the lower limit only. This screen parameter is usually used and declared in SELECTION-SCREEN and not in Dialog Screens.

So in this tutorial, I will discuss and show to you, how can we implement SELECT-OPTIONS in dialog screens. As I always says, follow these steps I detailed below:

Steps:
1. The first step is create a screen in SE80. Then on that screen, add a susbcreen just like below. I named my subscreen as SUB1. So you can name your subscreen anything you want.


2. The next procedure is to create the SELECT-OPTION using selection-screen but declared as subscreen. As you can see below, Screen 200 is declared as a subscreen. This subscreen will be called into the container we created in Step 1. Then after declaring the subscreen 200, use the event START-OF-SELECTION then call your main screen 100. Take note also, to create this as a separate INCLUDE program.


3. After creating the subscreen, you need to call this subscreen into your main screen. So what to do is, click your main screen, let say Screen 100. In the Flow Logic tab, enter the following or refer to the screenshot below:

On the part of Process Before Output: 
CALL SUBSCREEN <name_of_your_subscreen> INCLUDING sy-repid '200'.

Please note that 200 is the subscreen no declared in Step 2.

On the part of Process After Input:
CALL SUBSCREEN <name_of_your_subscreen>.


4. Lastly, save and activate your program. Try to run and you will that SELECT-OPTION is now implemented in to your dialog screen.


I hope you enjoy again reading this post. If you have any query or question, please drop a message to me. I am so much willing to answer you and give feedback as soon as I read your message to me. Cheers.. Enjoy reading... :)

How to implement different PF-STATUS types?

PF-STATUS is used to allow the user to communicate with the system where the defined function codes direct the user actions to the ABAP program. In dialog programming, there are three types of pf-status available for the developer, namely normal screen, dialog box and context menu (see screenshot below)


In this tutorial, I will discuss the last two statuses on how to create and implement into your ABAP applications.

A. Dialog Box Status – this status works when your screen type is defined as modal dialog box. Normally, this type of status is used with a popup screen where it is called upon using the keywords CALL SCREEN xxx STARTING AT x1 y1. Take note the keywords STARTING AT as this is the keywords to make it as a popup screen.

In order to use and implement this status, follow the steps detailed below.

STEPS:1. First, set your screen type as modal dialog box.


2. Once set, create a PF-STATUS with a type of Dialog Box as seen below.


In this next screen, there are two default commands: Ok and exit. So for demo purposes, I use the exit function. I just type any command name for this function. So it depends again on you, what you want to call each commands.


3. Then on the PBO of your screen, set the PF-STATUS you declared above.


4. Save and activate your program. Try to run and display the popup screen. Click the small “x” button at the upper right of the popup screen and it will close the screen. This is one of the applications of a dialog box status.


B. Context Menu Status – this status is triggered when the user pressed the right mouse key or SHIFT F10, a list of command is shown on the screen. It allows user to select list of functions dynamically defined. It can be assigned to the following screen elements namely: Input/output fields, Text fields, Table controls, Group boxes, subscreens pushbuttons, checkboxes, or radio buttons.

Please note that in my sample, I added a textbox in my screen. In this textbox, I will add here the context menu status. So in your implementations, it could be other screen elements. To implement, follow these steps.

STEPS:
1. Open your screen where you will add your context menu. In my case, it is Screen 200. As can be seen below, the added textbox.


2. Double click this screen element to display the screen painter attributes. On the field ON_CTMENU_, enter a name for your context menu. In my sample, I entered “Context”. So it depends on you what you want to call.


3. Go back to your program and create the GUI status. From the status type, select context menu.


4. In the screen menu, add your function codes. In my sample below, I added the following function codes: ADD, EDIT, DEL and EXIT. So it depends on your requirement, what function codes to be added here. By the way, the part in blue is not shown initially. In order to display it, just pressed the ENTER key or double click the parameter in black.


5. After setting the GUI status, create a subroutine. Take note the name of the routine as it must be the same as the one you defined in the screen painter attribute. Then instantiate a class with reference to CL_CTMENU. Call the method LOAD_GUI_STATUS exporting the program name, status name and the class.


6. Save and activate your program. Try to run. Press right click on the textbox and the context menu you defined then be displayed.


Enjoy Reading... Keep on visiting. :)

How to debug smartform in production system?

Have you encountered now a logical bug in your smartform which only appears when transported in the production system? Then we cannot replicate the same issue in our development box. So in this case, we have no option but to debug the form directly in production system, right? But we all know that setting a debugging point in the smartform is prohibited in this system. So do you have any idea to debug it?

In this tutorial, I will discuss a simple technique on how to debug the form even on the production system without any interference on the actual code. Just follow the following steps detailed below.

Steps:
1.Run tcode Smartform and open your form. If you are not authorized in your production system to open your form, go back into your development system. 
 

2. Once your form is open, go to main menu, click on Environment-->Function Module Name.
 

3. In this screenshot, you will see the function name of this form. Take note that every smartform you created, a function name is generated unlike in sapscript that no FM is created.
 

4. So in the previous steps, we get the name of the function module generated for this form. Our next goal is to determine which part of the form will it going to stop. So in my sample as you see, I need to debug the program lines under %CODE1. Please take note the name of the program lines since we will use this later.
 

5. After getting the function module name of the form and determining the part where we will going to debug, we are ready to set the breakpoint now. Go to SE37 and input the FM name generated above. Then click display the button. Perform this procedure in your production system. If you dont have any access in SE37, then ask your Basis people to provide you.
 

6. Then on the toolbar, select the find button with plus sign. 
 

7. Then on this screen, input the name of the program lines you want to debug. Then select the option "In main program". Then click ok.
 

8. In this screen, it will show what lines contains your search word. Just double click it so you will be directed in the actual code.
 

9. Finally, you will see now your code and you can put a breakpoint just like below. Run your program again and debugging mode will then be prompted.


Enjoy reading... Keep on visiting my blogs. :)

How to transport a variant set in ALV?

In this tutorial, I will discuss how to attach the ALV Variant to a transport request no. So basically, I will not discuss here how to create a report which will be displayed via an ALV grid. I presumed, you have now created your own report using an ALV grid.

Steps:
1. Run your report and it should display the ALV grid with its standard toolbar.The first thing to do is to create a variant by clicking this button "Save layout" button or press CTRL + F10. Take note, the variant to be created here will show the arrangement of the columns of your ALV grid. So before creating a variant, arrange first your columns with your preference then create your variant.


2. In this screen, fill up the name of your variant. Dont remove the symbol "/". Just add the name of your variant after that symbol (see below sample). Then type a description of your variant. Then click the ok button.


3. Next, go to Settings-->Layout-->Layout Management.

4. The name of your variant will be displayed in here just like below.

5. Finally, on the main menu, click on Layout-->Transport. This will call now the transport request window were you can now add your variant to your transport no.


Enjoy. Keep on reading. :)

How to create a dynamic internal table?

Dynamic internal table is an extension to the internal table concept. It is used when the number of fields is NOT known at the design time or until the compile time. So in this tutorial, I will discuss the basic methods in implementing a dynamic internal table.

First add the static structure. When I say static structure, this is the structure that is declared explicitly in your ABAP program. In my sample codes below, I have two fields for my static structure. (see TYPES: t_output in the sample code below).

Next, count how many no. of columns to be added dynamically. You can compute this from the selection screen from where it will be referenced. So in my sample code below, I have one parameter. Based from this parameter, user will enter how many columns they want to add. So be sure, you must define this point since this is critical where the number of columns will be determined. Remember that the number of column is the number of loop.

Then, combine the dynamic columns together with the static fields. However, before you can combine you must do the loop adding the dynamic column with their fieldname and datatype. (see subroutine f_add_dyn_field in the sample code below)

Finally, create the dynamic table by instantiating it with reference to cl_abap_structdescr . The dynamic table then will be passed to the FM REUSE_ALV_GRID_DISPLAY for display. Remember also in creating the fieldcatalog, you must do a loop to add the dynamic column. Otherwise, it will not be displayed. For reference, see the routine f_build_fieldcatalog.

Complete Sample Code:

  1
  2
  3
  4
  5
  6
  7
  8
  9
 10
 11
 12
 13
 14
 15
 16
 17
 18
 19
 20
 21
 22
 23
 24
 25
 26
 27
 28
 29
 30
 31
 32
 33
 34
 35
 36
 37
 38
 39
 40
 41
 42
 43
 44
 45
 46
 47
 48
 49
 50
 51
 52
 53
 54
 55
 56
 57
 58
 59
 60
 61
 62
 63
 64
 65
 66
 67
 68
 69
 70
 71
 72
 73
 74
 75
 76
 77
 78
 79
 80
 81
 82
 83
 84
 85
 86
 87
 88
 89
 90
 91
 92
 93
 94
 95
 96
 97
 98
 99
100
101
102
103
104
105
106
107
108
109
110
111
112
113
114
115
116
117
118
119
120
121
122
123
124
125
126
127
128
129
130
131
132
133
REPORT  y_dynamic_table.

TYPE-POOLS : abap,slis.

TYPES: BEGIN OF t_output,
  bukrs TYPE bukrs,
  dmbtr TYPE dmbtr,
END OF t_output.

DATA:
   wa_data_ref         TYPE REF TO data,
   wa_struct_type      TYPE REF TO cl_abap_structdescr,
   wa_elem_type        TYPE REF TO cl_abap_elemdescr,
   wa_comp_fld         TYPE cl_abap_structdescr=>component,
   i_comp_tab          TYPE cl_abap_structdescr=>component_table,
   i_comp_tot_tab      TYPE cl_abap_structdescr=>component_table,
   g_total_field       TYPE i,
   g_tabix(2)          TYPE c.

DATA:
   i_fieldcatalog      TYPE slis_t_fieldcat_alv WITH HEADER LINE,
   g_layout            TYPE slis_layout_alv.

FIELD-SYMBOLS:
   <fs_it_output>      TYPE STANDARD TABLE,
   <fs_wa_output>      TYPE ANY.

SELECTION-SCREEN BEGIN OF BLOCK b1 WITH FRAME.
PARAMETERS: p_nocol(2) TYPE c DEFAULT 5.
SELECTION-SCREEN END OF BLOCK b1.

START-OF-SELECTION.
  PERFORM f_add_static_structure.
  PERFORM f_add_dyn_field.
  PERFORM f_create_dyn_itab.
  PERFORM f_display_alv_report.

*&--------------------------------------------------------------*
*&      Form  F_CREATE_DYN_ITAB
*&--------------------------------------------------------------*
FORM f_add_static_structure.
  wa_struct_type ?= cl_abap_typedescr=>describe_by_name( 'T_OUTPUT' ).
  i_comp_tab = wa_struct_type->get_components( ).
  APPEND LINES OF i_comp_tab TO i_comp_tot_tab.
ENDFORM.                    " F_CREATE_DYN_ITAB

*&--------------------------------------------------------------*
*&      Form  F_ADD_DYN_FIELD
*&--------------------------------------------------------------*
FORM f_add_dyn_field .
  g_tabix = 0.
  DO p_nocol TIMES.
    g_tabix = g_tabix + 1.
    wa_elem_type ?= cl_abap_elemdescr=>describe_by_name( 'DMBTR').
    CONCATENATE 'COL_' g_tabix  INTO wa_comp_fld-name.
    wa_comp_fld-type = cl_abap_elemdescr=>get_p(
    p_length = wa_elem_type->length
    p_decimals = wa_elem_type->decimals ).
    APPEND wa_comp_fld TO i_comp_tot_tab.
  ENDDO.
ENDFORM.                    " F_ADD_DYN_FIELD

*&--------------------------------------------------------------*
*&      Form  F_CREATE_TAB
*&--------------------------------------------------------------*
FORM f_create_dyn_itab.
  wa_struct_type = cl_abap_structdescr=>create( i_comp_tot_tab ).
  CREATE DATA wa_data_ref TYPE HANDLE wa_struct_type.
  ASSIGN wa_data_ref->* TO  <fs_wa_output>.
  CREATE DATA wa_data_ref LIKE STANDARD TABLE OF <fs_wa_output>.
  ASSIGN wa_data_ref->* TO <fs_it_output>.
ENDFORM.                    " F_CREATE_TAB

*&--------------------------------------------------------------*
*&      Form  f_display_alv_report
*&--------------------------------------------------------------*
FORM f_display_alv_report .
  PERFORM f_create_layout USING g_layout.
  PERFORM f_build_fieldcatalog.
  CALL FUNCTION 'REUSE_ALV_GRID_DISPLAY'
    EXPORTING
      i_callback_program       = sy-repid
      i_callback_pf_status_set = 'PF_STATUS'
      is_layout                = g_layout
      it_fieldcat              = i_fieldcatalog[]
    TABLES
      t_outtab                 = <fs_it_output>
    EXCEPTIONS
      program_error            = 1
      OTHERS                   = 2.
ENDFORM.                    " F_DISPLAY_ALV_REPORT

*&--------------------------------------------------------------*
*&      Form  f_create_layout
*&--------------------------------------------------------------*
FORM f_create_layout USING p_gd_layout TYPE slis_layout_alv.
  p_gd_layout-zebra = 'X'.
  p_gd_layout-colwidth_optimize = space.
ENDFORM. " f_create_layout

*&--------------------------------------------------------------*
*&      Form  pf_status
*&--------------------------------------------------------------*
FORM pf_status USING ut_extab TYPE slis_t_extab.
  SET PF-STATUS  'STANDARD_FULLSCREEN'  OF PROGRAM 'SAPLKKBL'.
ENDFORM.                    "pfstatus

*&--------------------------------------------------------------*
*&      Form  f_build_fieldcatalog
*&--------------------------------------------------------------*
FORM f_build_fieldcatalog.
  REFRESH i_fieldcatalog.
  i_fieldcatalog-fieldname  = 'BUKRS'.
  i_fieldcatalog-seltext_l  = 'Company Code'.
  i_fieldcatalog-outputlen  = 20.
  APPEND i_fieldcatalog TO i_fieldcatalog.
  CLEAR i_fieldcatalog.
  i_fieldcatalog-fieldname  = 'DMBTR'.
  i_fieldcatalog-seltext_l  = 'Amount'.
  i_fieldcatalog-outputlen  = 10.
  APPEND i_fieldcatalog TO i_fieldcatalog.
  CLEAR i_fieldcatalog.
  g_tabix = 0.
  DO p_nocol TIMES.
    g_tabix = g_tabix + 1.
    wa_elem_type ?= cl_abap_elemdescr=>describe_by_name( 'DMBTR').
    CONCATENATE 'COL_' g_tabix  INTO wa_comp_fld-name.
    i_fieldcatalog-fieldname  = wa_comp_fld-name.
    i_fieldcatalog-seltext_m  = wa_comp_fld-name.
    i_fieldcatalog-outputlen  = 13.
    APPEND i_fieldcatalog TO i_fieldcatalog.
  ENDDO.
ENDFORM.                    "f_build_fieldcatalog


Output:


Five columns are added.


thanks a lot again for reading... keep on visiting this blog... enjoy... :)

How to create maintenance generator?

In this tutorial, I will discuss how to create a Maintenance Generator which is an add-on in creating tables. This is important to do if your user asked you that they will maintain that particular table.So the following steps will be undertaken.

Steps:
1. Go to SE11 and open your table. Go to the main menu Utilities-->Table Maintenance Generator


2. This screen below appears. Fill up the following fields:
Authorization group = &NC& (w/o auth group). If your team created an authorization grou, ask them and type it here. But if none, then this option would suffice.

Function Group = name of your function group. If none yet, click here to create your own.

Then select One step maintenance type and input 100 as the screen no.You can also select the button Find Scr  Numbers in the toolbar.Then click the create button on the toolbar. Finally Save it and go back to your table.


3. In the previous step, the maintenance generator is now created and your table is now ready to accept records. So in this step, you will add new records now to your table. Go to tcode SM30 and enter the name of your table like this one below.Then hit the display button.


4. In this screen, click on the button "New Entries" to enter new records and the ALV grid becomes editable.


Enter your records accordingly. Then save afterwards.


5. In order to view if your records are added into your table, go back to SE11 or SE16 and type the name of your table. Finally display the contents. It looks like something like this one.


Happy happy reading.. Enjoy...

How to change a $TMP package into a Z* or Y* package?

Sometime when we develop an ABAP program, we save it as LOCAL ($TMP) object specially if we dont want to transport to other system such program or maybe, the Transport No. is not yet created by the Basis people.


So in this tutorial, I will show to you how to change from local object ($TMP) to a Z* or Y* package and add its transport no.

STEPS:

1. Open your program in SE38. Click Goto-->Object Directory Entry.


2. This screen below appears. Click on the pencil button to change.


 Once clicked, the package parameter is now modifiable. Type here your Z* or Y* package and hit the save button.


After you hit the Save button, the screen for adding TR number appears. There you can now add the transport no as specified by you.

Thanks for reading again. Enjoy

How to debug Sapscript?

There are two ways to debug a SAPSCRIPT form. In this tutorial, I will discuss these two methods.

Method 1:
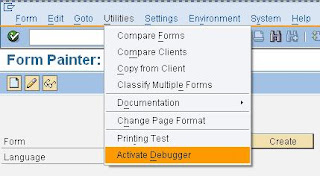
Run tcode SE71. Then from the main menu, click Utilities -->Activate debugger. Run your program and the debugger window will be prompted on you. Then start your debugging day. :)


Method 2:
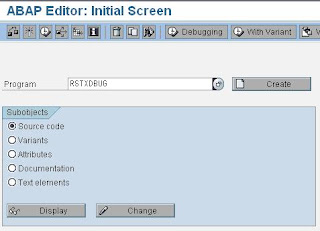
Go to tcode SE38 and execute the program RSTXDBUG. Then run your program where your sapscript is attached. You will see the debugger mode is on.


Happy debugging day... :)

How to create standard table?

When I was starting ABAP years ago, I was puzzled how to create tables for storing data. Unlike in my previous programming experiences, I used MySQL for my web developments and MSSQL for my windows application programs. These databases are easily to use in creating tables.Though I have experiences on other databases, I am still baffled how to create tables in SAP (that was years back).

So in this tutorial, I will discuss in my simplest way how to create your first standard table in SAP. I listed the following steps-by-steps.

STEPS:
1.Run tcode SE11 in your command bar. Then type the name of your table. Be sure to start with Z or Y when creating the name of your table. Then hit the create button.
 

 2.In this screen below, fill up the short text for your table. Give a meaningful description. On the delivery class, select "A" for application table. And for the data browser, select "Display/maintenance allowed" option.


3.Next step is click on the "Fields" tab. In this tab, enter all the fields that you needed. As seen in my sample below, I entered four fields. Please take note to add the field MANDT as this is the field that determines if the table becomes a client dependent. In short, this table is only visible to that client. Unlike if this field is not added, the table is visible or accessible to any client.


4.Click the button "Technical Setting" on the toolbar. This screen below appears after. On the data class parameter, select APPL0 for master data. And for the size category, I just choose 0 which is the least among the selection. So in your table creation, the size depends on you. If you think your table needs more space then select 1 or 2 or 3 etc. Afterwhich, click the save button above.


5.For the next step, on the main menu, click Extras->Enhancement Category.

This screen below appears after. Select the second option which you can enhance the table after.


6. Congratulations and your done creating your first table. Activate your table and save it as local object. Please note that no error and warnings must be prompt as you activate your table. If persists, try to solve these issues then activate again.


7. In order to view your table contents, click this button on the toolbar.


And there you are, you will see now this screen, where you can now display the contents of your table. But right now, since this is newly created, no records were stores in your table yet.


Thanks again for reading. Enjoy...

How to download the data structure of tables in SE11?

Good morning people around the world. Its me again doing some blogs. Sharing to you some tips and tricks in the SAP world. Well, before I s...